
Flask包含强大的Jinja模板语言,学习Flask之前要先学习一下jinja。
在Jinja2之前,已经有类似的模板语言,如JSP,Django。这些语言实际上包含了变量以及一些编程逻辑,当它们被呈现为HTML时,它们会被实际值取代。
变量和/或逻辑放置在标签或分隔符之间。例如,Jinja模板% … %用于表达式或逻辑(比如for循环),同时 … 用于向用户输出表达式或变量的结果。后者标记在呈现时被替换为一个或多个值,并且最终由用户看到。
Jinja模板只是.html文件。按照惯例,它们位于Flask项目的”/templates”目录中。如果你熟悉字符串格式化或插值,模板语言遵循相似的逻辑类型-只是整个HTML页面的规模。
简单示例
运行这些示例(pip insatll jinja2)之前,确保安装了Jinja。1
2
3
4
5
6
7
8Python
>>> from jinja2 import Template
>>> t = Template("Hello {{ something }}!")
>>> t.render(something = "world")
u'Hello world!'
>>> t = Template("My favorite numbers: {% for n in range(1,10) %} {{ n }}" "{% endfor %}")
>>> t.render()
u'My favorite numbers: 1 2 3 4 5 6 7 8 9'
注意呈现给用户的实际输出如何落在标签内。
Flask 示例
创建以下项目结构:1
2
3├── requirements.txt
├── run.py
└── templates
激活 virtualenv 安装 flask1
$ pip install flask
添加下列代码到run.py1
2
3
4
5
6
7
8
9
10
11from flask import Flask, render_template
app = Flask(__name__)
@app.route("/")
def template_test():
return render_template('template.html', my_string="Wheeeee!", my_list=[0,1,2,3,4,5])
if __name__ == '__main__':
app.run(debug=True)
这里我们建立路由/,通过render_template()函数将 template.html 传递到 /地址下。这个函数必须有一个模板名字,你也可以通过关键字参数将值传到模板中。如本例中的my_string和my_list。
创建下列模板:1
2
3
4
5
6
7
8
9
10
11
12
13
14
15
16
17
18
19
20
21
22
23
24
25
26
27
28<!DOCTYPE html>
<html>
<head>
<title>Flask Template Example</title>
<meta name="viewport" content="width=device-width, initial-scale=1.0">
<link href="http://netdna.bootstrapcdn.com/bootstrap/3.0.0/css/bootstrap.min.css" rel="stylesheet" media="screen">
<style type="text/css">
.container {
max-width: 500px;
padding-top: 100px;
}
</style>
</head>
<body>
<div class="container">
<p>My string: {{my_string}}</p>
<p>Value from the list: {{my_list[3]}}</p>
<p>Loop through the list:</p>
<ul>
{% for n in my_list %}
<li>{{n}}</li>
{% endfor %}
</ul>
</div>
<script src="http://code.jquery.com/jquery-1.10.2.min.js"></script>
<script src="http://netdna.bootstrapcdn.com/bootstrap/3.0.0/js/bootstrap.min.js"></script>
</body>
</html>
在templates文件夹中保存为template.html。注意这些模板标签,你能猜到会输出什么吗?
运行后浏览器打开http://127.0.0.1:5000/ ,你会看到: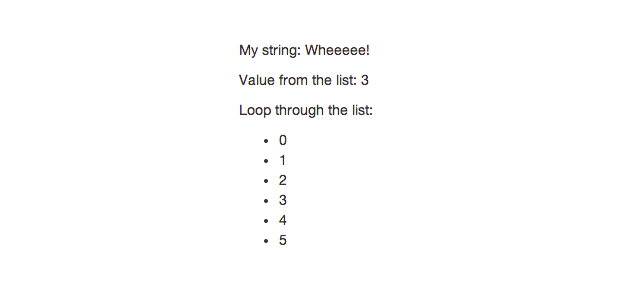
值得注意的是,Jinja只支持一些控制结构 - if语句和for循环是两个主要结构。语法与Python类似,不同之处在于不需要冒号,并且块的终止是使用endifor endfor而不是由空白完成的。您还可以完成控制器或视图中的逻辑,然后使用模板标记将每个值传递给模板。但是,在模板本身内执行这样的逻辑要容易得多。
模板继承
模板通常利用继承,其中包含一个基模板,用于定义所有后续子模板的基本结构。使用% extends % 和 % block %实现继承。
这个用例很简单:随着应用程序的增长,并且您继续添加新模板,您需要保持常见代码(如HTML导航栏,Javascript库,CSS样式表等)同步,这是很多工作。使用继承,我们可以将这些常见的部分移动到父/基模板,以便我们可以创建或编辑这样的代码,并且所有子模板都将有该代码。
您应该始终在您的基本模板中添加尽可能多的循环代码,以节省您未来的时间,这将远远超过最初的投资时间。
让我们将继承添加到我们的示例中。
创建基模板:1
2
3
4
5
6
7
8
9
10
11
12
13
14
15
16
17
18
19
20
21
22
23
24
25
26<!DOCTYPE html>
<html>
<head>
<title>Flask Template Example</title>
<meta name="viewport" content="width=device-width, initial-scale=1.0">
<link href="http://netdna.bootstrapcdn.com/bootstrap/3.0.0/css/bootstrap.min.css" rel="stylesheet" media="screen">
<style type="text/css">
.container {
max-width: 500px;
padding-top: 100px;
}
h2 {color: red;}
</style>
</head>
<body>
<div class="container">
<h2>This is part of my base template</h2>
<br>
{% block content %}{% endblock %}
<br>
<h2>This is part of my base template</h2>
</div>
<script src="http://code.jquery.com/jquery-1.10.2.min.js"></script>
<script src="http://netdna.bootstrapcdn.com/bootstrap/3.0.0/js/bootstrap.min.js"></script>
</body>
</html>
保存为layout.html.
你注意到% block %标签了吗?这定义了子模板可以填充的块(或区域)。此外,这只是通知模板引擎子模板可能会覆盖模板中的这个块。
可以将这些视为占位符,由来自子模板的代码填充。
接下来
更新 template.html:1
2
3
4
5
6
7
8
9
10
11
12
13
14{% extends "layout.html" %}
{% block content %}
<h3> This is the start of my child template</h3>
<br>
<p>My string: {{my_string}}</p>
<p>Value from the list: {{my_list[3]}}</p>
<p>Loop through the list:</p>
<ul>
{% for n in my_list %}
<li>{{n}}</li>
{% endfor %}
</ul>
<h3> This is the end of my child template</h3>
{% endblock %}
so,% extends %告诉模板引擎该模板“扩展”了另一个模板layout.html。换句话说,这建立了模板之间的链接。
运行。你会看到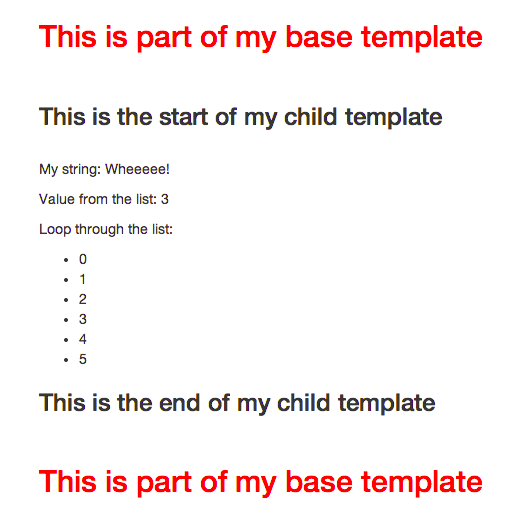
一个常见的用例是添加导航栏。
添加以下代码到基模板layout.html,紧跟在开始
1 | <nav class="navbar navbar-inverse" role="navigation"> |
现在每个子模板都将具有相同的导航栏。从Java哲学中引用一条真理“Write once, use anywhere.”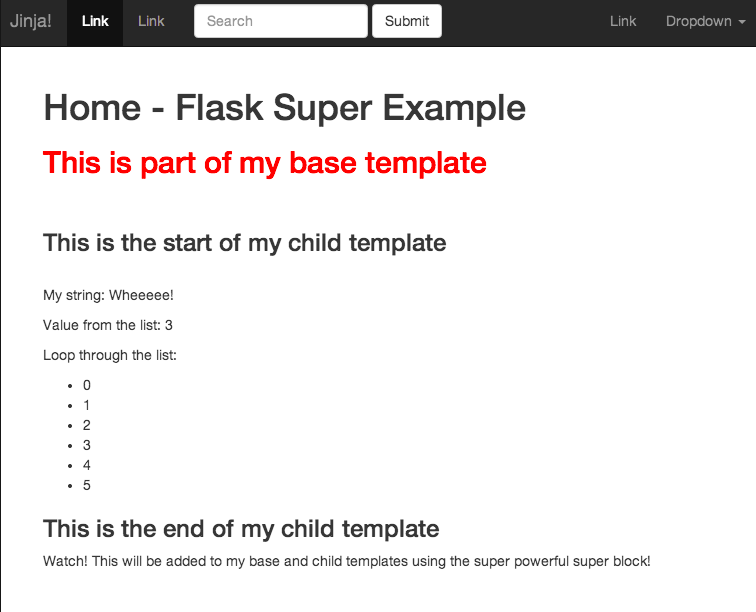
Super Blocks
如果你需要从基本模板渲染块,使用 super block.1
{{ super() }}
添加页脚到基模板:1
2
3
4
5
6
7<div class="footer">
{% block footer %}
Watch! This will be added to my base and child templates using the super powerful super block!
<br>
<br>
{% endblock %}
</div>
添加后的代码应该是这样:1
2
3
4
5
6
7
8
9
10
11
12
13
14
15
16
17
18
19
20
21
22
23
24
25
26
27
28
29
30
31
32
33
34<!DOCTYPE html>
<head>
<title>Flask Template Example</title>
<meta name="viewport" content="width=device-width, initial-scale=1.0">
<link href="http://netdna.bootstrapcdn.com/bootstrap/3.0.0/css/bootstrap.min.css" rel="stylesheet" media="screen">
<style type="text/css">
.container {
max-width: 500px;
padding-top: 100px;
}
h2 {color: red;}
</style>
</head>
<body>
<div class="container">
<h2>This is part of my base template</h2>
<br>
{% block content %}{% endblock %}
<br>
<h2>This is part of my base template</h2>
<br>
<div class="footer">
{% block footer %}
Watch! This will be added to my base and child templates using the super powerful super block!
<br>
<br>
<br>
{% endblock %}
</div>
</div>
<script src="http://code.jquery.com/jquery-1.10.2.min.js"></script>
<script src="http://netdna.bootstrapcdn.com/bootstrap/3.0.0/js/bootstrap.min.js"></script>
</body>
</html>
运行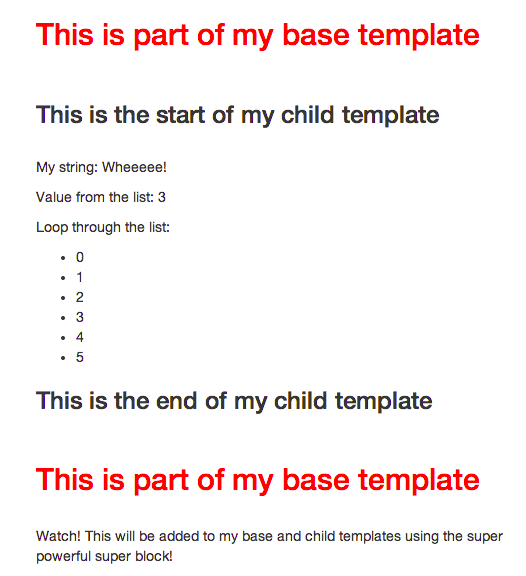
添加 super block到 template.html1
2
3
4
5
6
7
8
9
10
11
12
13
14
15
16
17{% extends "layout.html" %}
{% block content %}
<h3> This is the start of my child template</h3>
<br>
<p>My string: {{my_string}}</p>
<p>Value from the list: {{my_list[3]}}</p>
<p>Loop through the list:</p>
<ul>
{% for n in my_list %}
<li>{{n}}</li>
{% endfor %}
</ul>
<h3> This is the end of my child template</h3>
{% block footer %}
{{super()}}
{% endblock %}
{% endblock %}
在浏览器中查看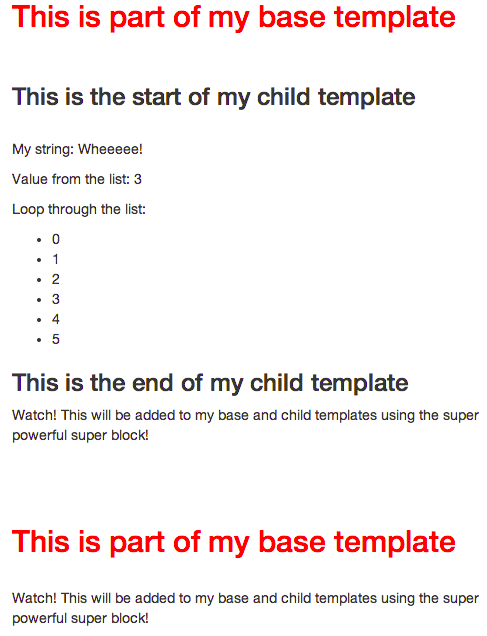
Suoer block用于父模板和子模板共享的通用代码,例如title两个模板共享标题的一部分,然后你只需要传入另一部分。
例如
父模板1
2
3{% block heading %}
<h1>{% block page %}{% endblock %} - Flask Super Example</h1>
{% endblock %}
子模板1
2
3
4{% block page %}Home{% endblock %}
{% block heading %}
{{ super() }}
{% endblock %}
看下效果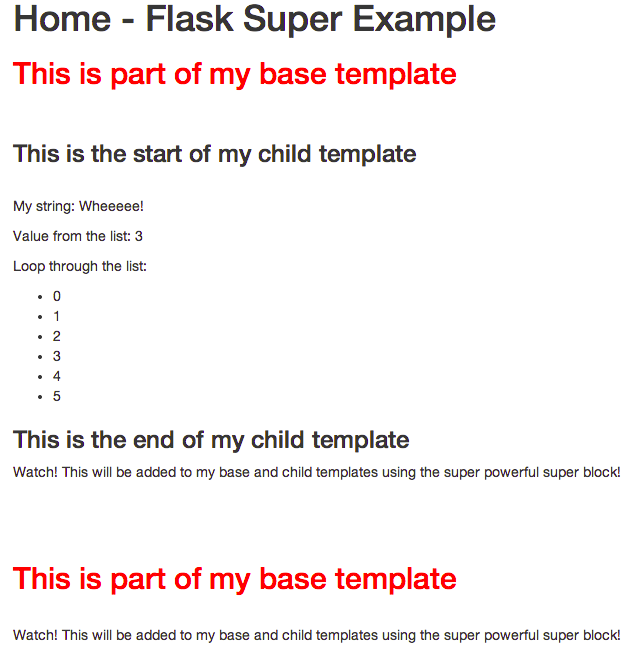
可以试试% block page %Home% endblock %从子模板中移除会发生什么。
尝试一下使用相同的方法更新title
除了硬编码,也可以使用动态方法
更新template.html中的两个代码片段:1
{%block title%} {{title}} {%endblock%}
1 | {%block page%} {{title}} {%endblock%} |
现在我们需要title从我们的控制器run.py中将一个变量传递给我们的模板:1
2
3
4
5@app.route("/")
def template_test():
return render_template(
'template.html', my_string="Wheeeee!",
my_list=[0,1,2,3,4,5], title="Home")
测试一下。
宏
在Jinja中,我们可以使用宏来抽象反复使用的常用代码片段,以避免重复我们自己。例如,突出显示导航栏上当前页面的链接(活动链接)很常见。否则,我们不得不使用if/ elif/ else语句来确定活动链接。使用宏,我们可以将这些代码抽象为一个单独的文件。
将 macros.html 添加到 templates目录中:1
2
3
4
5
6
7{% macro nav_link(endpoint, name) %}
{% if request.endpoint.endswith(endpoint) %}
<li class="active"><a href="{{ url_for(endpoint) }}">{{name}}</a></li>
{% else %}
<li><a href="{{ url_for(endpoint) }}">{{name}}</a></li>
{% endif %}
{% endmacro %}
在这里,我们使用Flask的请求对象,默认情况下它是Jinja的一部分,用于检查请求的端点,然后将该active类分配给该端点。
使用nav navber-nav基本模板中的类更新无需列表:1
2
3
4
5<ul class="nav navbar-nav">
{{ nav_link('home', 'Home') }}
{{ nav_link('about', 'About') }}
{{ nav_link('contact', 'Contact Us') }}
</ul>
另外,请确保在模板顶部添加导入:% from “macros.html” import nav_link with context %。
注意我们如何调用nav-link宏并传递两个参数,即端点(来自我们的控制器)和我们想要显示的文本。
最后,让我们向控制器添加三个新端点:1
2
3
4
5
6
7
8
9
10
11
12
13
14
15
16
17@app.route("/home")
def home():
return render_template(
'template.html', my_string="Wheeeee!",
my_list=[0,1,2,3,4,5], title="Home")
@app.route("/about")
def about():
return render_template(
'template.html', my_string="Wheeeee!",
my_list=[0,1,2,3,4,5], title="About")
@app.route("/contact")
def contact():
return render_template(
'template.html', my_string="Wheeeee!",
my_list=[0,1,2,3,4,5], title="Contact Us")
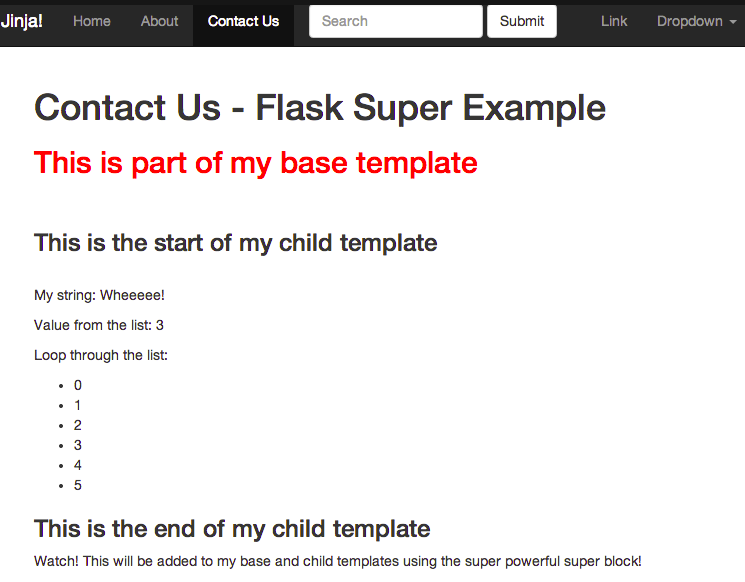
刷新页面
过滤器
Jinja使用过滤器来修改变量,主要用于格式化目的。
例如1
{{ num | round }}
这将对num变量近似取值。如果传值 num=46.99, 将输出47.0.
关于过滤器的更多知识,你可以看这里.
在某些情况下,你可以在括号中指定可选参数。
例如1
{{list | join(',')}}
这将通过逗号分隔符加入列表。
测试一下,添加下列代码到 template.html.1
<p>Same list with a filter: {{ my_list|join(', ') }}</p>
除了内置的过滤器,我们也可以自己创建。
让我们添加一个我们自己的。一个常见的例子是自定义日期时间过滤器。
创建应用程序后,将以下代码添加到我们的控制器 - app = Flask(name):1
2
3
4
5
6@app.template_filter()
def datetimefilter(value, format='%Y/%m/%d %H:%M'):
"""convert a datetime to a different format."""
return value.strftime(format)
app.jinja_env.filters['datetimefilter'] = datetimefilter
使用@app.template_filter()装饰器,我们将datetimefilter()函数注册为过滤器。
过滤器的默认名称只是该函数的名称; 然而,你可以通过传递一个参数来定制它 - 例如,
@app.template_filter(formatdate)。
接下来,我们将过滤器添加到Jinja环境中,使其可访问。现在可以使用了。
将以下代码添加到我们的子模板中:1
<h4>Current date/time: {{ current_time | datetimefilter }}</h4>
最后,只需将日期时间传递给我们的模板:1
current_time=datetime.datetime.now()
测试一下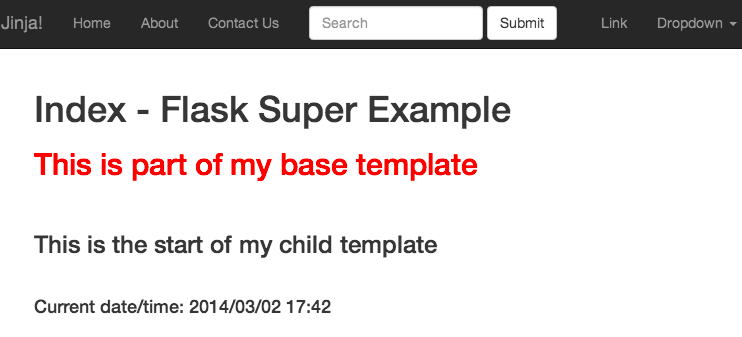
这只是简明教程,详细教程请看这里。